Plant Tipsy!
A whimsical tipsy planter that looks like you walked straight into
Alices’Wonderland....
It was in the 80’s today, which is really hot for
April. Seems like we bypassed Spring and
jumped into summer! All this sun got my butt in gear to “Summerize” my back deck. Yes I know the name of my blog, and it's supposed to be about food but I figure hey why not share a little DIY project!
Ok back to my deck. It’s not a fancy deck by any stretch, nor is it very big, but it’s my place of peace and beauty. I’ve spent countless hours with my family eating, talking, reflecting, and just enjoying my “little slice”. So just like every year, I planted my flower and herbs this weekend. Although this year it was a tad sad since I normally do this with my Mom. However, to keep up with our tradition I planted with her in my heart and mind.
BUT this year I wanted to switch it up a little bit. Do something different; something asymetrical and funky with my flower pot arrangement. Taa Daa – the topsy turvy tipsy planters! Have to give credit to my friend Becky, aka Lady C, for giving me the idea of painting them teal and yellow. Thanks Beck!
I am so happy with how the planters turned out that I decided to share how it's done. If you’re feeling your creative mojo flowing give it a try. So simple, and so creative!
Terracotta flower pots (4 or 5) in your choice of size. Start with the larger one on the bottom, and
smaller ones on top.
A metal rod cut to the height of your arrangement. I cut it to 45 inches.
Potting soil.
Spray paint in your choice of color (or leave pots in
natural color).
An array of flowers.
On a newspaper, spray the pots with the paint. Allow to dry
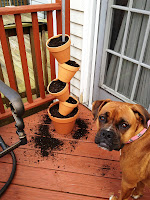
Step 3 = Assembly (taken prior to painting just to get an idea)
  |
| Gotta have a cute puppy pic! |
Using the larger pot on the bottom, set the pole in the
middle of pot in the center of of the drainage hole. Add soil and pack in so that it holds of the
bar. Add some water to compact it a bit.
Thread the next pot over the bar and sit it in the soil of
the base pot. Lean it out. Add soil.
Thread the next pot,
Add soil.
Repeat until finished.
This is where you can be creative. Don’t be afraid to add varying heights and colors, it will make the arrangement so much more interesting. Give it a nice watering when you’re finished and clean up the sides of pots.
Step 5 = ENJOY your funky cool planters!


Thanks for sharing Laura. It turned out great. Love the color choice. You're so creative!
ReplyDelete